Introduction to 3D Room Simulations
These 3D Room Simulations are built off a framework named Three.js. The enhancement described here (implemented by myself) provides a way to create room simulations without any programming -- a room is configured via an XML-formatted text file that defines objects inside the room and which references a set of texture (i.e., image) files to be pasted onto walls or other objects.
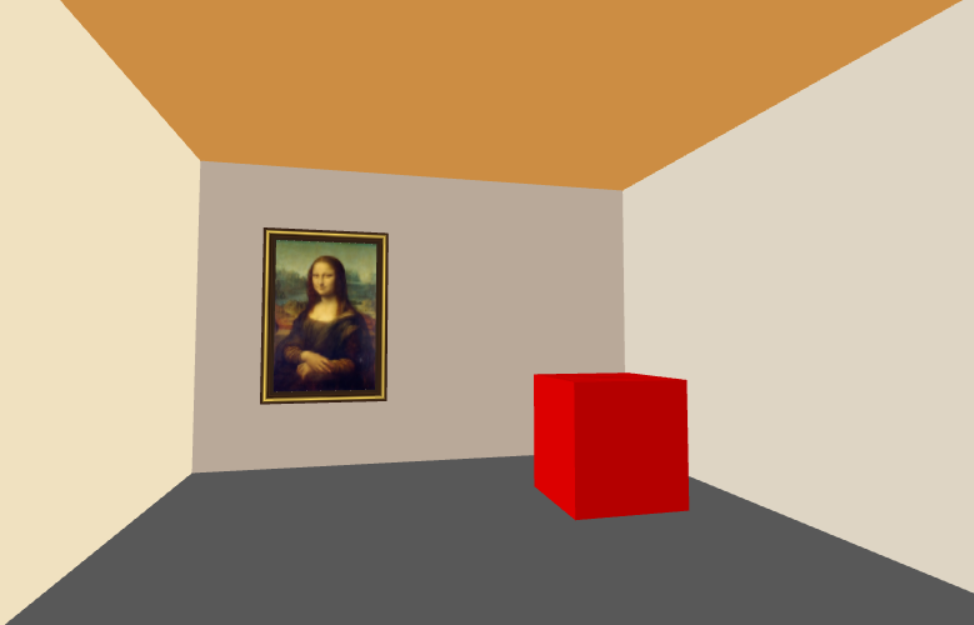
An example of a simple simulation is shown below:
Here are the contents of the configuration file (named "Simple Example (see Help).room") for this simulation:
<?xml version="1.0" encoding="utf-8"?>
<ROOM xmlns="http://www.johnewing1000.com/3D_Room" text="Simple Example"
   xMax="150" yMax="100" zMax="200"
   observerPosition="pos(50,42,190)" lookAtPosition="pos(115,57,0)"
   floorColor="rgb(88,88,88)" zMinWallColor="rgb(185,169,153)" xMaxWallColor="rgb(222,213,196)"
   zMaxWallColor="rgb(233,227,216)" xMinWallColor="rgb(240,225,192)" ceilingColor="rgb(204,141,67)">
   <TEXTURES>
      <TEXTURE index="0" file="white.png" />
      <TEXTURE index="1" file="Mona_Lisa.png" />
      <TEXTURE index="2" file="Frame_For_Mona_Lisa.png" />
   </TEXTURES>
   <OBJECTS>

       <SURFACE text="Mona Lisa painting"
         width="33.6" height="50" x="40" y="50" z="0.5"
         color="rgb(255,255,255)" texture="1" rotation="(0.0,0.0,0.0)" />

      <FRAME text="Frame for Mona Lisa"
         width="40.6" height="58" thick="4.0" x="40" y="50" z="0.6"
         color="rgb(255,255,255)" texture="2" rotation="(0.0,0.0,0.0)"/>

      <BOX text="Sample box"
         xMin="100" xMax="130" yMin="0" yMax="32" zMin="40" zMax="70"
         color1="rgb(180,0,0)" color2="rgb(220,0,0)" color3="rgb(180,0,0)"
         color4="rgb(200,0,0)" color5="rgb(180,0,0)" color6="rgb(180,0,0)" />

      <CYLINDER text="Sample vertical cylinder"
         x="130" z="180" yMin="0.0" yMax="100" diameter="20" color="rgb(70,86,152)" />

   </OBJECTS>
</ROOM>
The following text describes the dimensions of the room:
xMax="150.0" yMax="100.0" zMax="200.0"
These can be real units such as inches or centimeters, or can be completely made up (as was the case here) simply to indicate the relative sizes of the various walls. The origin point (x=0, y=0, z=0) is to the lower left of the Mona Lisa picture where the intersection of the two walls meets the floor. X increases as one goes to the right along and past Mona Lisa. Y increases as you go up to the ceiling. Z increases as one goes to the the opposite part (back) of the room.
The following text describes the observer's initial position and a location that he/she is initially looking at:
observerPosition="pos(50,42,190)" lookAtPosition="pos(115,57,0)"
The next section of text defines the colors for the floor, the four walls, and the ceiling.
   floorColor="rgb(88,88,88)" zMinWallColor="rgb(185,169,153)" xMaxWallColor="rgb(222,213,196)"
   zMaxWallColor="rgb(233,227,216)" xMinWallColor="rgb(240,225,192)" ceilingColor="rgb(204,141,67)">
These colors are specified by their red-green-blue components, with each component ranging from 0 to 255.
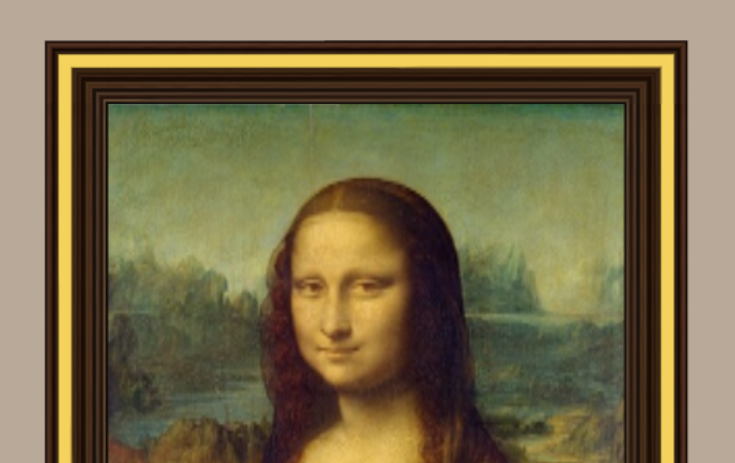
The next section defines a series of textures that will be used by the simulation. In order for all colors to appear as expected, the first/default texture needs to refer to an image file that is all white. The other textures are custom images that will need to be shown in the room. The Mona Lisa image is in a png file and has dimensions of 355 x 499. A small image to define the frame for this painting is stored in a png file with dimensions of 64 x 64.
Following this are definitions of a series of objects that will appear in the room. The first object is a SURFACE whose texture is the Mona Lisa image. A SURFACE is a two-dimensional object that either has a specified color or else has a texture mapped onto it. If the color is {255,255,255} and if the texture reference is greater than 0, then the texture will be applied. Else if the texture reference is 0, then the solid color reference will be applied.
This SURFACE is configured as follows:
       <SURFACE text="Mona Lisa painting"
         width="33.6" height="50" x="40" y="50" z="0.5"
         color="rgb(255,255,255)" texture="1" rotation="(0.0,0.0,0.0)" />
The second line defines the size of the SURFACE and the given X, Y, and Z coordinates mark the center position of where the SURFACE is to be located. The rotational part is a little tricky. If the SURFACE is to appear on or parallel to the wall with Z = 0 (which is the case here), then the rotation is to be set to (0.0,0.0,0.0). Below are the rotations to be used to place SURFACEs on other walls, or on the floor, or on the ceiling.
| Location |
Rotation |
| Wall defined by z = 0 |
(0.0,0.0,0.0) |
| Wall defined by x = 0 |
(0.0,1.57079632679,0.0) |
| Wall defined by z = zMax |
(0.0,3.14159265359,0.0) |
| Wall defined by x = xMax |
(0.0,-1.57079632679,0.0) |
| Floor |
(1.57079632679,0.0,0.0) |
| Ceiling |
(-1.57079632679,0.0,0.0) |
The next object is a FRAME which is defined as follows.
      <FRAME text="Frame for Mona Lisa"
         width="40.6" height="58" thick="4.0" x="40" y="50" z="0.6"
         color="rgb(255,255,255)" texture="2" rotation="(0.0,0.0,0.0)"/>
Texture #2 refers to the small image shown below (actual size).

The X, Y, and Z coordinates define the center of the frame. These settings match the same values for the Mona Lisa SURFACE, except that the Z position was slightly modified to have the frame be slightly over the painting. The width and height settings define the full size of the frame (i.e., the outer edges). The thick setting defines the frame thickness. Special coding was prepared to wrap the frame around the enclosed item in the way a real frame would appear, such as partially shown below.
The next object is a red box, defined by the following:
      <BOX text="Sample box"
         xMin="100" xMax="130" yMin="0" yMax="32" zMin="40" zMax="70"
         color1="rgb(180,0,0)" color2="rgb(220,0,0)" color3="rgb(180,0,0)"
         color4="rgb(200,0,0)" color5="rgb(180,0,0)" color6="rgb(180,0,0)" />
This form of a box is one that has all its dimensions parallel to the walls, floor, and ceiling of the room (there is another form of box which is briefly discussed later). The colors are for each of the six surfaces of the box. Here we have defined distinct colors for the top and left side of the box that are different than the other four sides.
The BOX object type has a distinct feature -- it occupies space that the observer can not enter while moving throughout the room.
In practice, the oblect types discussed so far (SURFACE, FRAME, and BOX) are the ones that are used most often. In fact, the simulation named "Dumbarton Oaks Music Room" was constructed entirely by these three object types alone.
The last object-definition in the configuration file is shown below.
      <CYLINDER text="Sample vertical cylinder"
         x="130" z="180" yMin="0.0" yMax="100" diameter="20" color="rgb(70,86,152)" />
This defines a large vertical blue column which can be seen by moving forward and turning sharply to the right.
Here are some other object types that are not used in this example. A COMPLEX_SURFACE is used to create a surface which is not restricted to be parallel to any wall. In this case the X,Y,Z positions need to be stated for each on the four corners. A COMPLEX_BOX requires X,Y,Z positions to be stated for all of the eight vertices. A MIRROR object produces reflectivity. There are two examples of its use in the "Fancy Bedroom" simulation. A TRIANGLE_LIST object is a powerful entity that can be used to replicate things with a curvy or complex structure. It consists of a large set of TRIANGLE obects. Each TRIANGLE object contains X,Y,Z positions for each of its three vertices. In practice, these triangles tend to be connected to each other along their edges.
I am providing these simulations on the Amazon EC2-hosted www.johnewing1000.com server, and I also can run this on my local PC. A local installation first requires an installation of Node.js. The custom software consists of a base directory that mainly contains mangled Javascript files, with two subdirectories containing rooms and textures. The server can then be started by a command line call. This will then print the following to tell how to connect via a web browser.
Wed Jan 14 2026 6:41:36 PM - Server started - connect via http://127.0.0.1:1339/
For additional information, contact John Ewing.